Configure Metadata Settings
On the [Metadata] tab, configure the metadata settings, default value, and layout of the operation screen of the device.
The metadata in a document to be delivered can contain the following metadata items:
-
basic metadata items that are defined by the system automatically
-
custom metadata items that are configured by the administrator.
Configure the custom metadata items on the [Metadata] tab of [Workflow Design] tab.
The following items can be specified for each metadata item:
-
Display Position: The items are displayed in the same order on the operation screen of the device and mobile device as the order displayed in the Management Console. You can change the display order by dragging and dropping items.
-
Display/Hide: You can specify whether to display a metadata item on the screen of the device or mobile app. To hide a metadata item, specify a setting value for the item. The specified setting value is used as the preset value, and the user cannot change the value of a hidden item from the device or mobile device.
-
Default Value: Values specified on the [Metadata] tab appear as default values on the operation screen and mobile device. The user can change these values as necessary: the display name, metadata to be configured, selection items to be displayed, and other settings.
Edit the metadata entry screen
Use the following procedure to edit the metadata entry screen:
-
From the list, select an input element according to the method for specifying the metadata item to be added.
-
 (Label)
 -
 (InputText)
 -
 (NumberStepper)
 -
 (DateField)
 -
 (Drop-down menu)
 -
 (Check box)
You can select from the following input elements:
You can add a preset text such as a message or description to the metadata screen.
You can add a metadata item in string format.
You can add a metadata item in integral number format.
You can add a metadata item in date format.
You can add a drop-down menu that has values in a CSV or SQL file or values manually entered as selection items. For details about configuring a drop-down menu, refer to page 342 "Configuring a drop-down list".
You can add a metadata item in the form of a check box.
-
To require entry of a metadata item specified in the positioned input element, select [Yes] in [Required Entry Item] on the [General Settings] screen.
-
In [General Settings] and [Dropdown ListBox], specify the other properties.
NOTES:
- When [Yes] is selected for [Auto Reset], all metadata items resume their default values when scanning is complete. However, the metadata items are not reset when: delivering from a smart device; scanning has failed.
- The number of characters that can be displayed on the device's operation panel may be fewer than what can be entered in the fields on the [Metadata] entry screen of the Management Console. In this case, the characters that cannot be displayed are omitted and "." is displayed instead.
- When using the Standard Operation Panel, you can display up to seven input elements per screen on the operation screen of the device. A separator is automatically added as necessary in the Management Console.
- Up to 50 input elements can be displayed on the metadata screen of the device. Of these 50 input elements, only 21 can be placed on the General Features screen (seven input elements per screen on three screens).
Configure a drop-down list
Depending on the Query type you select, the settings differ. Each query type is shown below.
When [Query Type] is set to [Manual Entry]
- Enter a value directly in [Option].
- Press the Enter key to start a new line, and then enter the next value.
- You can add up to 50 values.
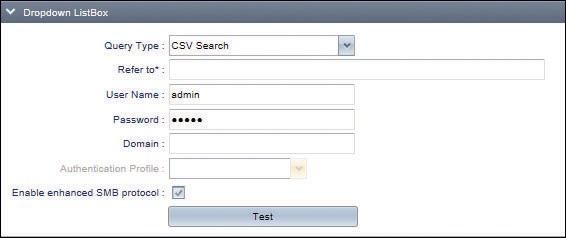
When [Query Type] is set to [CSV Search]
-
Enter the UNC path in [Refer to] to specify a CSV file. The system supports files with the ".csv" and ".CSV" extensions.
-
You cannot use a local file path for a workflow when the [Job Processing Location] is set to [On Device].
-
Entering a [User Name] and [Password] is optional. When you have not entered these items, the system uses the service account on the Delegation Server to access the CSV file.
-
When you have not entered the domain, the system uses the domain of the profile selected in [Authentication Profile]. When you have not specified [Authentication Profile], the system does not use the domain.
-
You can specify a domain name in [User Name] by using the following formats:
-
DomainName/UserName
-
UserName@DomainName
-
If you specify a domain name in [User Name], the domain name specified in [Domain] is ignored.
-
"\" and "@" cannot be used for a user name or a domain name.
-
The system supports both NTLMv2 and Kerberos as the authentication method. To use Kerberos Authentication, specify the profile to be used in [Authentication Profile]. When the [Enable enhanced SMB protocol] check box is selected, [Authentication Profile] cannot be specified. In this case, Kerberos authentication is always used when Kerberos authentication is enabled. Otherwise, NTLM authentications used.
-
When the [Enable enhanced SMB protocol] check box is selected, CSV search is executed using the SMB3.0 protocol. When it is cleared, the SMB1.0 protocol is used.
-
When a workflow configured using SLNX v3.0.2 or older version is imported, the [Enable enhanced SMB protocol] check box is cleared.
-
Click [Test] to check that the settings have been configured correctly. An error message is displayed if the specified CSV file cannot be accessed.
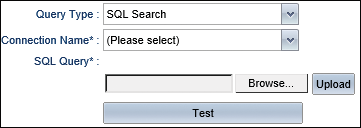
When [Query Type] is set to [SQL Search]
-
You can select [SQL Search] only in a metadata item of a workflow when the [Location] setting is set to [Server].
-
The database connector configured in advance in [Metadata Database Connection] is displayed in [Connection Name]. For details about the settings of [Metadata Database Connection], refer to page 365 "Configuring the Metadata Database Connection".
-
Click [Browse] to select the SQL file to be used, and then upload the file. The system supports files with the ".sql" extension.
Click [Test] to check that the settings have been configured correctly. An error message is displayed if the database cannot be accessed or the SQL statement is invalid.
When setting a query string, specify input elements of the same data type for comparison. An error will occur due to a comparison failure if you specify input elements of data types that do not match.
You can define the metadata items for the following input elements and data types:
|
Input element |
Data type |
Description |
|---|---|---|
|
InputText |
char, nchar, varchar, nvarchar |
Enter manually |
|
DateField |
date |
Select from a calendar or enter manually |
|
NumberStepper |
int, bigint |
Enter manually or select from a list |
|
Dropdown ListBox |
char, nchar, varchar, nvarchar |
Enter manually (when editable) or select from a list |
|
Checkbox |
boolean |
Select or clear a check box |
About Metadata Interdependence
You can use the metadata interdependence function to narrow down the selection items for custom metadata dynamically according to the value specified in another field. To use the interdependence function, use [ ] to enter the tag name of the metadata item to be referenced in the SQL statement that is assigned to the target drop-down list.
Example:
SELECT DISTINCT NAME FROM MEMBER WHERE MEMBER.DEPT = [DEPARTMENT]
When the SQL statement shown above is assigned to the field whose tag name is MEMBER, you must specify the value to be inserted to [DEPARTMENT] of the SQL statement in the field whose tag name is DEPARTMENT. An error occurs if the MEMBER field is specified without specifying a value in the DEPARTMENT field.
You can define the interdependence of metadata items for the following input elements and data types:
|
Input element |
Data type |
Description |
|---|---|---|
|
InputText |
String |
Enter manually |
|
DateField |
Date |
Select from a calendar or enter manually |
|
NumberStepper |
LONG type |
Enter manually or select from a list |
|
Dropdown ListBox |
String |
Enter manually (when editable) or select from a list |
|
Checkbox |
Boolean |
Select or clear a check box |
NOTES:
- Do not use a SQL identifier or reserved word, or the column name contained in a SQLDB instance as the metadata tag name entered in a SQL statement. Otherwise, a malfunction will occur in SQL search.
- Do not use [ or ] in a SQL statement except when describing a tag name of a metadata item.
- Do not reference a tag name of a metadata item that is not defined on the Metadata tab. Otherwise, an execution error will occur.
- The SQL statement specified in a .sql file only allows a SELECT statement.
- A value is not displayed on the drop-down menu if the query returns NULL.
- The value in the leading column is displayed on the drop-down menu if the query returns values in multiple columns.
Change the display order of input elements
Input elements will appear on the operation screen of the device in the order specified on the metadata entry screen.
To change the display order, select the input element to be moved and then drag and drop the item to the desired position.
Hide or Delete an input element
You can configure an input element to be hidden on the operation screen of the device. This functionality is useful when you want to add certain metadata in every document that does not need to be specified by the user. Configure the value for the input element to be hidden in advance.
-
On the metadata entry screen, configure the preset values for the input element to be hidden.
-
Select the display name of the input element to be hidden, and then drag and drop the item to the hidden item (preset) field or
 .
. -
To delete an input element, select the display name of the input element to be deleted, and then drag and drop the item to
 (Trash).
To display a hidden entry element, select the display name of the input element, and then drag and drop the item to  .
.